my awesome friend tara posted a link to this on her twitter.
what an awesome idea, i love it! we should totally do this here!

Monday, March 30, 2009
micheal de meng workshop, part two!
so! yesterday was the second day of the micheal demeng workshop. amazing, of course, but not quite as fabulous as the first day. the theme of the second was supposed to be nicho libra, but there wasn't really any instruction on creating the boxes or niches. he covered more in the critique at the end than he did during the instruction portion of the day!
i wasn't super inspired about making a niche, because i thought that was more something i could do at home, so i decided to concentrate more on the paint layering techniques that micheal taught us, so that if i ran into problems, he would be there to help (and it was good, because i did, and he helped!)! i'm really glad i took the second day of the workshop, because i really wanted the full experience, but i didn't feel like i got as much accomplished, or that i learned as much.
that being said, the workshop/classes were OF COURSE, so incredible! such a positive experience in pretty much every way (except my body hating me, of course, but even that was okay, it held up!). i am so so glad that i took it, and that i managed to do both days. it was awesome to work in that setting, talking to other artists, because as much as i LOVE all of my crafty and arty friends on craftster and in blog land, i am pretty isolated un terms of crafty or arty friends locally. and the workshop was incredibly inspiring (which i was totally hoping for!) and now all i want to do is get my studio organized so that i can start making stuff every day! i have so many ideas for new projects, i can't wait to start them all! and i am already looking forward to next year, when he'll come back and teach again, and his new book will be out!
so..... you wanna see what i worked on? of course you want pics, right? as sweets always says "without pics it didn't happen!" (sweets is a little picture obsessed, but since she takes amazing ones, we don't hold it against her!)
so. i worked on 3 projects yesterday, alternating while they were drying. i showed you the first two pieces that i started, here's what more has been done!
first, the cocktail fork piece. this was really hard to photograph, the flash makes it seem darker than it really is. i'm definitely going to add more, i think that the top and the bottom pieces need to be blended together better. i mentioned that saturday i'd done a coat of molding paste and white acrylic on it.
so yesterday i started layering paints.
the first set of paints -
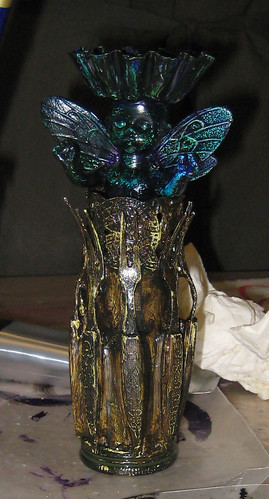
second set of paints -
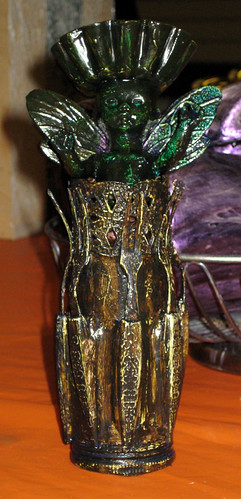
you can see that the colours are a little bit more tied together in the second picture, but there's still more work to be done.
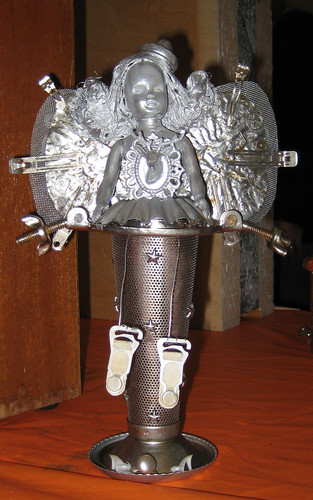
the sieve piece -
i decided that i wanted the girl to blend more with the piece, to make her seem more robotic, in a stepford wives kinda way (with her "trophy chest"! that was a total fluke, i wasn't thinking that when i did it, but it goes well, doesn't it?). i did a coat of gesso, and then a coat of grey paint as a kind of primer.
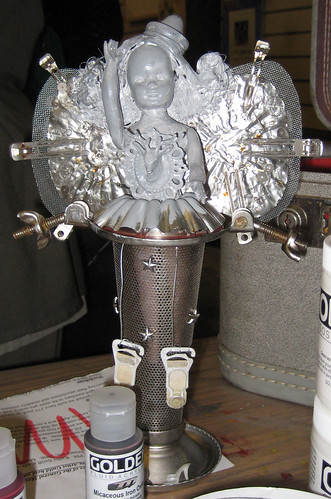
then i did a coat of lightened up illuminaires silver paint and did some dry brushing on the bottom using golden's interference paints. she definitely needs more coats, and maybe a wash, to tone down the brightness of the silver (perhaps an uszhh, as micheal calls it!). and more dry brushing needs to be done. i might use some micaceous iron oxide on it too, to give the top part a bit more of a leaded look.
with flash and without flash

and the piece i started yesterday, the BVM (blessed virgin mary). i was thinking about niches of boxes that i'd like to have on my walls, and i'm always berating muself for never getting around to making stuff for my bathroom, so this seemed like a good idea. i had two of these statues, but one had several marks on it.
i started by giving it a layer of gesso. my plan was to use a layer of dioxazine purple paint, then a layer of quinacridone/nickel azo gold, create the look of verdigree with several colours dry brushed on, then a wash of uzshh (quinacrodone gold and carbon black). i wanted her to look like an old brass statue, if you know what they look like with the green on them. micheal suggested i paint her black, then use interference violet on her, to get a bit more movement in the purple. i liked that idea, so i started painting her carbon black. it looked SO COOL all black and glossy while the paint was drying, but it was weird how uncomfortable i felt painting mary black!
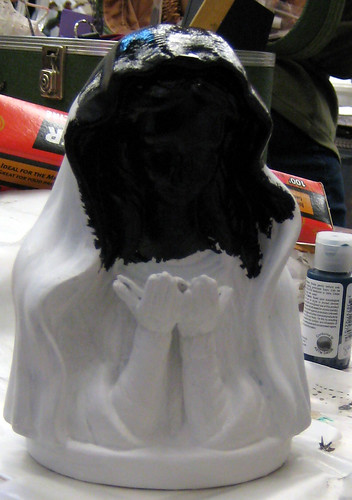
after i'd added the layer of interference violet, i REALLY liked how it looked. unfortunately, my painting was really sloppy with the interference and it's super obvious! i thought i was going to put another layer over, remember? i think i'm going to sand her down and repaint the interference violet, even the black of neccessary.
current status, with flash and without. isn't the interference violet gorgeous on the black? oooh!

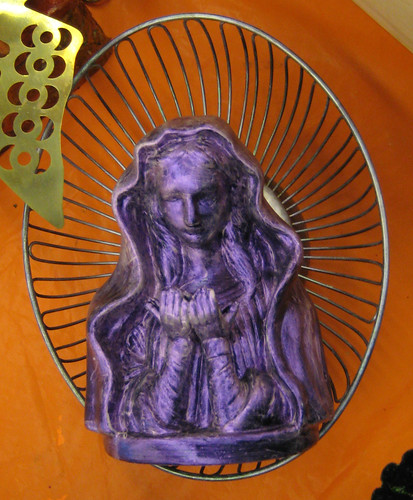
the back piece for her is a silver plated bowl. it has a bit of a patina since it's silver, and i dry brushed interference silver, violet, blue and green on it. it really looks like the mary is reflecting on it when you see it in person.
i still need to attach the mary and put a hanger on the back, but that has to wait until i'm done painting or re-painting her.
and that's what i did yesterday! i'm really excited to keep playing around with the paint layering, and do do a couple of niches or boxes.
if you ever get an opportunity to take classes with micheal demeng, JUMP AT IT! it is so worth it!
i wasn't super inspired about making a niche, because i thought that was more something i could do at home, so i decided to concentrate more on the paint layering techniques that micheal taught us, so that if i ran into problems, he would be there to help (and it was good, because i did, and he helped!)! i'm really glad i took the second day of the workshop, because i really wanted the full experience, but i didn't feel like i got as much accomplished, or that i learned as much.
that being said, the workshop/classes were OF COURSE, so incredible! such a positive experience in pretty much every way (except my body hating me, of course, but even that was okay, it held up!). i am so so glad that i took it, and that i managed to do both days. it was awesome to work in that setting, talking to other artists, because as much as i LOVE all of my crafty and arty friends on craftster and in blog land, i am pretty isolated un terms of crafty or arty friends locally. and the workshop was incredibly inspiring (which i was totally hoping for!) and now all i want to do is get my studio organized so that i can start making stuff every day! i have so many ideas for new projects, i can't wait to start them all! and i am already looking forward to next year, when he'll come back and teach again, and his new book will be out!
so..... you wanna see what i worked on? of course you want pics, right? as sweets always says "without pics it didn't happen!" (sweets is a little picture obsessed, but since she takes amazing ones, we don't hold it against her!)
so. i worked on 3 projects yesterday, alternating while they were drying. i showed you the first two pieces that i started, here's what more has been done!
first, the cocktail fork piece. this was really hard to photograph, the flash makes it seem darker than it really is. i'm definitely going to add more, i think that the top and the bottom pieces need to be blended together better. i mentioned that saturday i'd done a coat of molding paste and white acrylic on it.
so yesterday i started layering paints.
the first set of paints -
second set of paints -
you can see that the colours are a little bit more tied together in the second picture, but there's still more work to be done.
the sieve piece -
i decided that i wanted the girl to blend more with the piece, to make her seem more robotic, in a stepford wives kinda way (with her "trophy chest"! that was a total fluke, i wasn't thinking that when i did it, but it goes well, doesn't it?). i did a coat of gesso, and then a coat of grey paint as a kind of primer.
then i did a coat of lightened up illuminaires silver paint and did some dry brushing on the bottom using golden's interference paints. she definitely needs more coats, and maybe a wash, to tone down the brightness of the silver (perhaps an uszhh, as micheal calls it!). and more dry brushing needs to be done. i might use some micaceous iron oxide on it too, to give the top part a bit more of a leaded look.
with flash and without flash
and the piece i started yesterday, the BVM (blessed virgin mary). i was thinking about niches of boxes that i'd like to have on my walls, and i'm always berating muself for never getting around to making stuff for my bathroom, so this seemed like a good idea. i had two of these statues, but one had several marks on it.
i started by giving it a layer of gesso. my plan was to use a layer of dioxazine purple paint, then a layer of quinacridone/nickel azo gold, create the look of verdigree with several colours dry brushed on, then a wash of uzshh (quinacrodone gold and carbon black). i wanted her to look like an old brass statue, if you know what they look like with the green on them. micheal suggested i paint her black, then use interference violet on her, to get a bit more movement in the purple. i liked that idea, so i started painting her carbon black. it looked SO COOL all black and glossy while the paint was drying, but it was weird how uncomfortable i felt painting mary black!
after i'd added the layer of interference violet, i REALLY liked how it looked. unfortunately, my painting was really sloppy with the interference and it's super obvious! i thought i was going to put another layer over, remember? i think i'm going to sand her down and repaint the interference violet, even the black of neccessary.
current status, with flash and without. isn't the interference violet gorgeous on the black? oooh!
the back piece for her is a silver plated bowl. it has a bit of a patina since it's silver, and i dry brushed interference silver, violet, blue and green on it. it really looks like the mary is reflecting on it when you see it in person.
i still need to attach the mary and put a hanger on the back, but that has to wait until i'm done painting or re-painting her.
and that's what i did yesterday! i'm really excited to keep playing around with the paint layering, and do do a couple of niches or boxes.
if you ever get an opportunity to take classes with micheal demeng, JUMP AT IT! it is so worth it!
Sunday, March 29, 2009
i lied!
i said i wouldn't be posting this weekend, but i lied, apparently!
just a quickie again, because i'm still gathering paper and ephemera to take to tomorrow's class.
today was fabulous! super fun and inspiring, i learned lots of stuff that i can't wait to play with more.
i actually did pretty well healthwise, my back didn't start getting really bad until the last hour or so. it definitely helped that i was up and down a lot, going to the power tool area, washing off my hands, etc, so i didn't get too stiff. i brought my own dremel, but there weren't enough plug ins really, so i just used his. i didn't have any of my own protective eye gear anyway, and metal sends off a lot of sparks, so i was glad to have them available!
i worked on two pieces today, starting the second one while i was waiting for the first one to dry. i didn't end up getting much painting done, and i didn't remember to take a picture of the painting that i DID do, but here are my two pieces in progress, pre-painting.
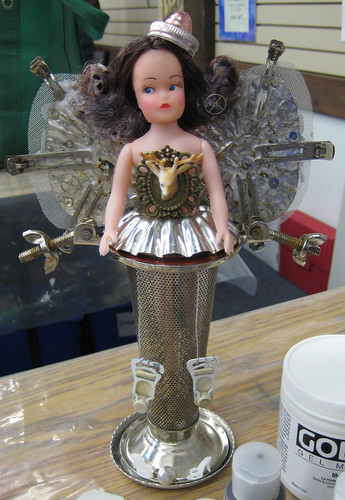
i added star studs in the bottom of this one after i took the picture, but otherwise the construction was done by this point. i'm not planning on painting this one as much, more just dry brushing to add colour.
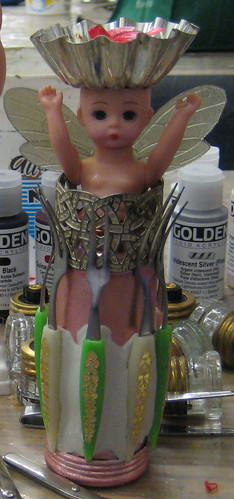
this was the first one i did, and it's turning out very cool. it was dry enough for me to add layers of mold paste and then white paint before the day was over. cutting the doll's head like that was super fun and a bit of a challenge - plastic gets HOT as you cut it!
so today went REALLY well. unfortunately, i didn't make it to the wine and cheese tonight, and i'm really disapointed. i planned to go home and sleep for an hour or so, but by the time i was half way home i was digging in my bag for pain meds and muscle relaxants. i came home and set my alarm, and i'm not sure if i got up and turned it off (my alarm's in the hallway so that i can't do that as easily) or if i just slept through it buzzing for 2 hours before it switched itself off! i woke up too late to go back, which sucks, but it gave me a bit more time to hang out and relax and upload pictures and chat with my mom, whose play had a matinee and an evening show today, which i sadly missed. (luckily it'll be in next month's theatre festival, so i'll go then!)
tomorrow is niche libre, either creating a home for one of the pieces i did today, or for something entirely. i need to go finish sorting through my ephemera and paper!
just a quickie again, because i'm still gathering paper and ephemera to take to tomorrow's class.
today was fabulous! super fun and inspiring, i learned lots of stuff that i can't wait to play with more.
i actually did pretty well healthwise, my back didn't start getting really bad until the last hour or so. it definitely helped that i was up and down a lot, going to the power tool area, washing off my hands, etc, so i didn't get too stiff. i brought my own dremel, but there weren't enough plug ins really, so i just used his. i didn't have any of my own protective eye gear anyway, and metal sends off a lot of sparks, so i was glad to have them available!
i worked on two pieces today, starting the second one while i was waiting for the first one to dry. i didn't end up getting much painting done, and i didn't remember to take a picture of the painting that i DID do, but here are my two pieces in progress, pre-painting.
i added star studs in the bottom of this one after i took the picture, but otherwise the construction was done by this point. i'm not planning on painting this one as much, more just dry brushing to add colour.
this was the first one i did, and it's turning out very cool. it was dry enough for me to add layers of mold paste and then white paint before the day was over. cutting the doll's head like that was super fun and a bit of a challenge - plastic gets HOT as you cut it!
so today went REALLY well. unfortunately, i didn't make it to the wine and cheese tonight, and i'm really disapointed. i planned to go home and sleep for an hour or so, but by the time i was half way home i was digging in my bag for pain meds and muscle relaxants. i came home and set my alarm, and i'm not sure if i got up and turned it off (my alarm's in the hallway so that i can't do that as easily) or if i just slept through it buzzing for 2 hours before it switched itself off! i woke up too late to go back, which sucks, but it gave me a bit more time to hang out and relax and upload pictures and chat with my mom, whose play had a matinee and an evening show today, which i sadly missed. (luckily it'll be in next month's theatre festival, so i'll go then!)
tomorrow is niche libre, either creating a home for one of the pieces i did today, or for something entirely. i need to go finish sorting through my ephemera and paper!
Saturday, March 28, 2009
quickie!
this is a very quick post, as it's already past 2am.
tomorrow (today!) is the first day of the Micheal deMeng classes!!! wahoo!!!
i'm SO excited!
i'm also kind of stressed, but not letting myself think about it. what if i totally suck? what if everything i make looks like a 6 year old made it? what if everyone looks at me like "what's she doing here?" what if my back starts hurting really bad? what if my hip acts up again?
see why i'm not letting myself think about it?! i can logically tell myself that i'm being ridiculous, that the reason i'm taking a class is to learn, so obviously i'm not going to rock, that everyone in the class is in the same situation, and that i'm taking my own chair, to try to prevent hurting, and i'm taking pain meds and muscle relaxants with me if it does start. and besides, as long as i stay sitting down, my hip doesn't hurt much anyway!
randomly, i met two others who are taking the class in the cash line up at the thrift store today! i was carrying a stack of games and this woman said something like "it looks like you're having a party!" and i was actually truthful (half the time i lie because people get traumatized at the thought of me ruining things or something) and said "oh, no, i use the pieces in art projects, so i stock up when the games are 50% off" the woman asked what kind of art and i kinda stumbled and said "oh, collage, assemblage, stuff like that" and then she looked at her friend and looked back at me and asked if i was taking the Micheal deMeng workshop tomorrow! we introduced ourselves, and then i was so frazzled that i promptly forgot their names. i'll feel stupid tomorrow i bet, but i was SO frazzled! i didn't even have time to stop at the thrift store, but i was RIGHT THERE, so i couldn't resist, and then the line up was so long and slow, but by that point i had a fire king casserole dish in my hand, so.....
this week has been utterly ridiculous. i had planned to take it easy, so that i wouldn't be tired or sore for the weekend, but i ended up being so ridiculously busy. i had at least one medical appointment every day, sometimes two, and i never remember to factor in the recovery time! and then there was the shopping... i told myself that it was because i was still searching for the perfect toys to take to the class, but i totally lied. really it was the thought of vintage pyrex at the monthly collectible sale!
so tomorrow will be a long day. it would have been anyway, between the class and the meet'n'greet afterwards, but considering what time it is, it'll be even longer. obviously, my plan to have everything gathered up in advance didn't work as well as it should have!
i'm not going to be posting this weekend, so i'll leave you with pictures to tide you over...
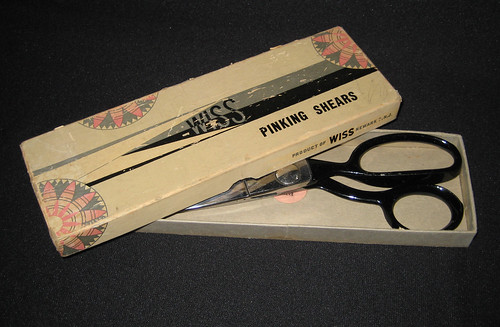
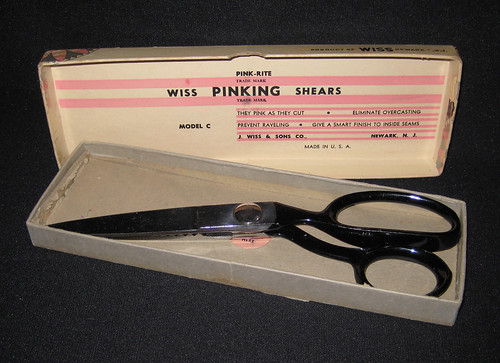
aren't they lovely? they have a really nice substantial weight, and even though i have a serger, i'm really looking forward to pinking edges just so that i can use them! the box has a lovely aged patina as well. they were a great find.
tomorrow (today!) is the first day of the Micheal deMeng classes!!! wahoo!!!
i'm SO excited!
i'm also kind of stressed, but not letting myself think about it. what if i totally suck? what if everything i make looks like a 6 year old made it? what if everyone looks at me like "what's she doing here?" what if my back starts hurting really bad? what if my hip acts up again?
see why i'm not letting myself think about it?! i can logically tell myself that i'm being ridiculous, that the reason i'm taking a class is to learn, so obviously i'm not going to rock, that everyone in the class is in the same situation, and that i'm taking my own chair, to try to prevent hurting, and i'm taking pain meds and muscle relaxants with me if it does start. and besides, as long as i stay sitting down, my hip doesn't hurt much anyway!
randomly, i met two others who are taking the class in the cash line up at the thrift store today! i was carrying a stack of games and this woman said something like "it looks like you're having a party!" and i was actually truthful (half the time i lie because people get traumatized at the thought of me ruining things or something) and said "oh, no, i use the pieces in art projects, so i stock up when the games are 50% off" the woman asked what kind of art and i kinda stumbled and said "oh, collage, assemblage, stuff like that" and then she looked at her friend and looked back at me and asked if i was taking the Micheal deMeng workshop tomorrow! we introduced ourselves, and then i was so frazzled that i promptly forgot their names. i'll feel stupid tomorrow i bet, but i was SO frazzled! i didn't even have time to stop at the thrift store, but i was RIGHT THERE, so i couldn't resist, and then the line up was so long and slow, but by that point i had a fire king casserole dish in my hand, so.....
this week has been utterly ridiculous. i had planned to take it easy, so that i wouldn't be tired or sore for the weekend, but i ended up being so ridiculously busy. i had at least one medical appointment every day, sometimes two, and i never remember to factor in the recovery time! and then there was the shopping... i told myself that it was because i was still searching for the perfect toys to take to the class, but i totally lied. really it was the thought of vintage pyrex at the monthly collectible sale!
so tomorrow will be a long day. it would have been anyway, between the class and the meet'n'greet afterwards, but considering what time it is, it'll be even longer. obviously, my plan to have everything gathered up in advance didn't work as well as it should have!
i'm not going to be posting this weekend, so i'll leave you with pictures to tide you over...
aren't they lovely? they have a really nice substantial weight, and even though i have a serger, i'm really looking forward to pinking edges just so that i can use them! the box has a lovely aged patina as well. they were a great find.
Wednesday, March 25, 2009
thrifting, pyrex love and chit chat!
i've been neglecting my blog, or at least i feel like i have. i've been thinking of blog posts, but i haven't had the motivation to write them up.
sunday evening i went into the city and had dinner with a friend, which was fabulous, but i've been feeling pretty crummy since then. i've been grouchy, because i HAD been feeling better, and i haven't wanted to talk to anyone, not even bloggers! it's funny how quickly you get used to feeling better and having mobility, and how badly it can affect your mood when you lose it again. however, i have had some GREAT thrifting luck in the past week or so, and that always makes me happy.
yesterday morning my sister called me up and asked me if i wanted a set of 4 pyrex cinderella bowls. um, yes! she was at the thrift store, so she put the set in her basket and carried it around with her until i could get there. my sister's so awesome!
this is the set she found for me - 4 cinderella bowls in the daisy pattern
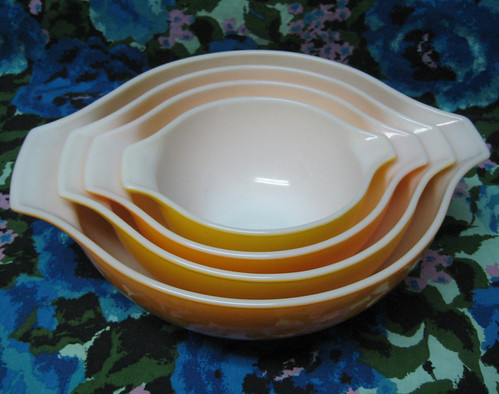
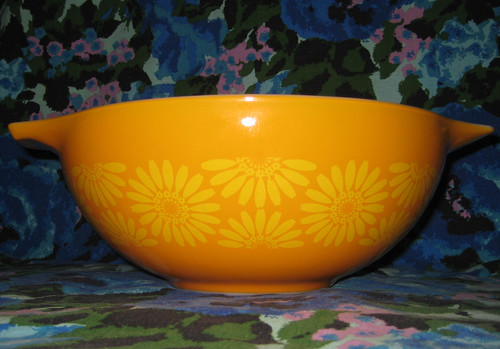
isn't it great? it's a bit newer than the ones i really love, but the fact that it's the full set, and isn't a super tacky 70s colour makes it okay!
i found a few other goodies, but by the time i got home i was limping really badly, so i slept most of the day instead of crafting or doing anything fun! after i slept though, i was feeling a bit better, so i started taking pictures of the days finds.
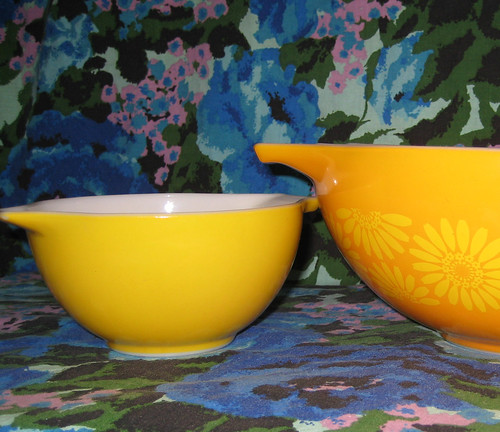
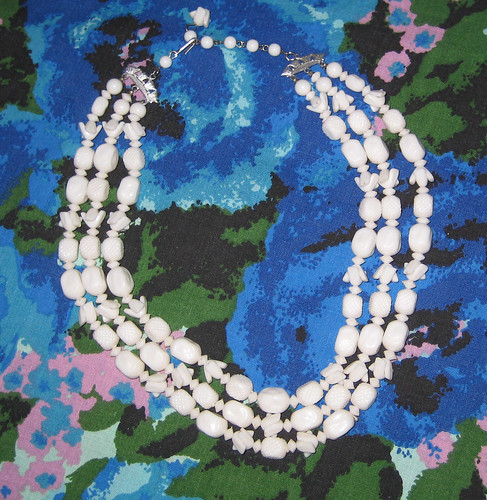
i collect lots of different things, but vintage beaded earrings and triple strand necklaces are a long standing collection with me, and they're getting harder and harder to find (or if i do find them, they're really expensive). yesterday i found one of each!

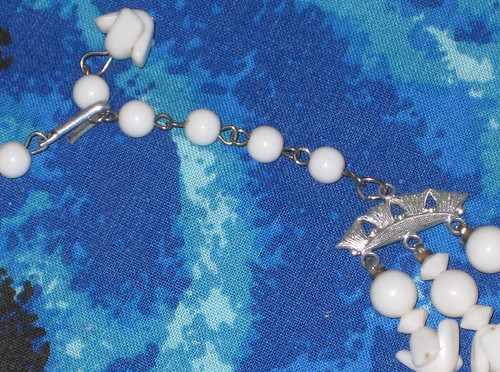
the necklace has really interestingly shaped beads, they're not the usual round ones.
i've also been getting more and more interested in petit point. i've started buying petit point jewelery whenever i find it, though it's unfortunately usually in gold settings! my grandmother gave me all of her petit point and needlepoint supplies while i was in manitoba most recently, and i'm really excited to play with it all! yesterday i found the sweetest little frame with a petit point flower in it.
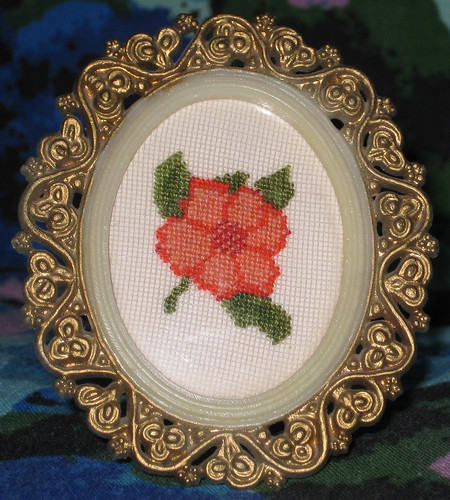
i love the little frame it's in too. i do like gold in some cases, i just won't wear it!
i got some other great stuff too, another vintage jewelery box for my bathroom, some black fortrel, some vintage trims, two sets of hankies and a really fabulous vintage tablecloth.
so even though i felt crummy, it was still a good thrifting day.
sunday evening i went into the city and had dinner with a friend, which was fabulous, but i've been feeling pretty crummy since then. i've been grouchy, because i HAD been feeling better, and i haven't wanted to talk to anyone, not even bloggers! it's funny how quickly you get used to feeling better and having mobility, and how badly it can affect your mood when you lose it again. however, i have had some GREAT thrifting luck in the past week or so, and that always makes me happy.
yesterday morning my sister called me up and asked me if i wanted a set of 4 pyrex cinderella bowls. um, yes! she was at the thrift store, so she put the set in her basket and carried it around with her until i could get there. my sister's so awesome!
this is the set she found for me - 4 cinderella bowls in the daisy pattern
isn't it great? it's a bit newer than the ones i really love, but the fact that it's the full set, and isn't a super tacky 70s colour makes it okay!
i found a few other goodies, but by the time i got home i was limping really badly, so i slept most of the day instead of crafting or doing anything fun! after i slept though, i was feeling a bit better, so i started taking pictures of the days finds.
i collect lots of different things, but vintage beaded earrings and triple strand necklaces are a long standing collection with me, and they're getting harder and harder to find (or if i do find them, they're really expensive). yesterday i found one of each!
the necklace has really interestingly shaped beads, they're not the usual round ones.
i've also been getting more and more interested in petit point. i've started buying petit point jewelery whenever i find it, though it's unfortunately usually in gold settings! my grandmother gave me all of her petit point and needlepoint supplies while i was in manitoba most recently, and i'm really excited to play with it all! yesterday i found the sweetest little frame with a petit point flower in it.
i love the little frame it's in too. i do like gold in some cases, i just won't wear it!
i got some other great stuff too, another vintage jewelery box for my bathroom, some black fortrel, some vintage trims, two sets of hankies and a really fabulous vintage tablecloth.
so even though i felt crummy, it was still a good thrifting day.
Tuesday, March 24, 2009
louie-boo
sunday was a very sad day in our house, as our cat louie had to go to a new home. we're very much pets for life in our house, our cats are a big part of our family, so it was really hard. my dad rescued louie when he was a kitten, and he went to live with my sister. she wasn't home nearly enough, so he was really lonely, and last july i brought him here to live with us. he's an inside cat, so he spent his days in my part of the house with me and sofie, and was let into the rest of the house at night once the cat door was shut. unfortunately he DID NOT get along with the other cats! he and sofie battled it out daily, she at least stood up to him, but the other 3 cats were terrified of him. he weighs about 21 lbs, compared to their 12 or 13 lbs, and he bullied them. we decided that it really wasn't fair to the older cats, so he had to go to a new home. his new mom is very excited to have him, and i think she'll love him to pieces and give him a good home, but i'm going to miss my big lug.

Sunday, March 22, 2009
Tutorial - Mending a Sweater Snag - easiest thing ever!
EDIT: hi craftzine readers! welcome!
i promised another mending tutorial, didn't i!
this is barely tutorial worthy, because it's SO easy. i thought everyone knew how to do this, but when i fixed a sweater of my little brother's, he and his girlfriend were AMAZED! it's funny how some things just seem like second nature to you because you can't remember not knowing it, but it's completely foreign to others.
anyway! onto the tutorial!
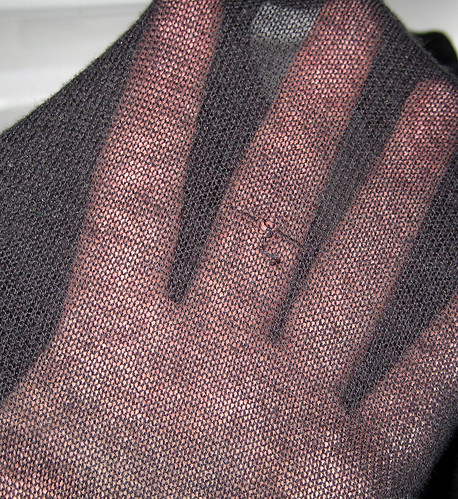
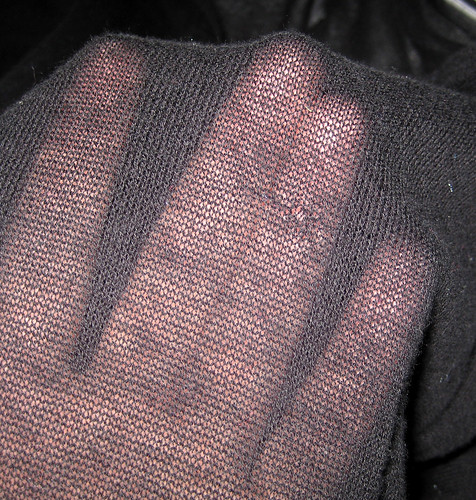
start with a sweater that's snagged, obviously! this sweater wasn't the best for photos, because it's so thin and see through, but it was the only i hadn't already fixed!
now haul out your needle threader. i have a fancy clover one, because i'm obsessed with their sewing notions (really), but the cheapies work fine too! needle threaders can be bought at a craft store, or even at a dollar store, and they're often found in basic sewing kits if you can't find them individually to buy.
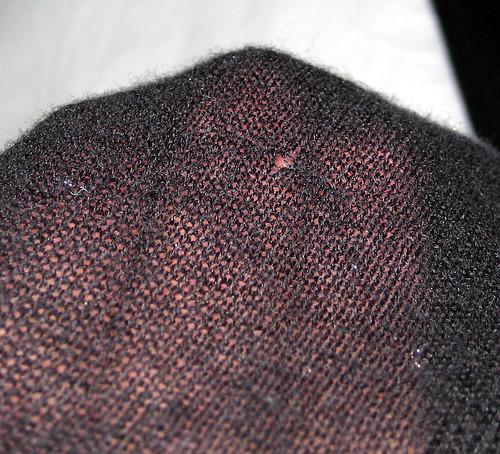
from the inside of the sweater, poke the needle threader wire through the hole where the snag is.

this is the tricky part! guide the threads of the sweater, the snag, into the little diamond wires. once they're in, gently pull the needle threader back to the inside of the sweater.
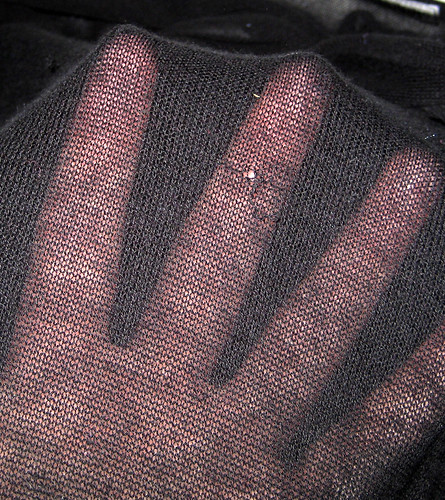
you're done! if the snag really pulled your sweater, you might need to gently tug it a bit, just to get the fibers straightened out.
there will still be a small hole on most sweaters, but trust me, no one will notice it except you!
super simple, right? i told you!
but wait! there's more tutorial!
some people find getting the snag into the needle threader to be a bit of a hassle, and i'm definitely one of them. depending on the weight of your sweater, it can be pretty darn fussy!
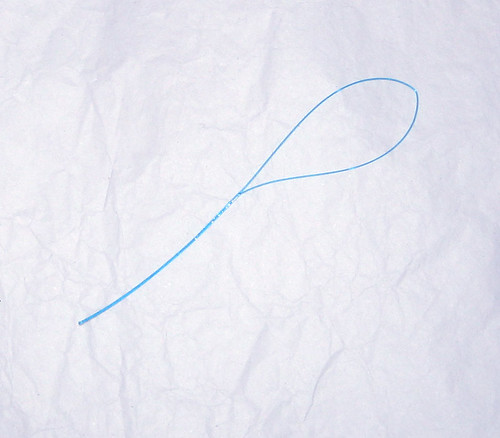
instead of a needle threader, you can also use dental floss threaders. i LOVE these, they're such a great invention. of course, i don't have braces, and i can floss using regular floss, but it's fabulous for crafty purposes! (i use them a lot to string beads on yarn for crocheting)
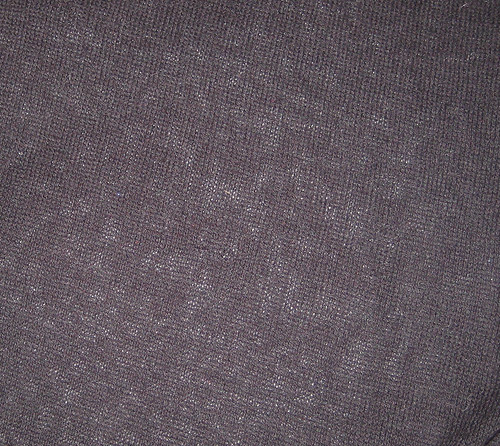
again, start with a snag (aren't i lucky that my sweater had enough snags to do this twice?!)
the floss threaders are easier to use because instead of trying to push the needle threader through from the inside, hoping you're in the right spot, you're going to push the hard end of the floss threader through the sweater from the outside. gently slide the end of the floss threader through right where the snag started.

again, fiddle with the snag and push it into the opening of the floss threader. it's a still a little bit fiddly, but since the floss threader had a much bigger opening, it's less fiddly than the needle threader.
done! again, you might need to gently tug the sweater fabric.
can you see where the snag was? it's practically invisible!
i promised another mending tutorial, didn't i!
this is barely tutorial worthy, because it's SO easy. i thought everyone knew how to do this, but when i fixed a sweater of my little brother's, he and his girlfriend were AMAZED! it's funny how some things just seem like second nature to you because you can't remember not knowing it, but it's completely foreign to others.
anyway! onto the tutorial!
start with a sweater that's snagged, obviously! this sweater wasn't the best for photos, because it's so thin and see through, but it was the only i hadn't already fixed!
now haul out your needle threader. i have a fancy clover one, because i'm obsessed with their sewing notions (really), but the cheapies work fine too! needle threaders can be bought at a craft store, or even at a dollar store, and they're often found in basic sewing kits if you can't find them individually to buy.
from the inside of the sweater, poke the needle threader wire through the hole where the snag is.
this is the tricky part! guide the threads of the sweater, the snag, into the little diamond wires. once they're in, gently pull the needle threader back to the inside of the sweater.
you're done! if the snag really pulled your sweater, you might need to gently tug it a bit, just to get the fibers straightened out.
there will still be a small hole on most sweaters, but trust me, no one will notice it except you!
super simple, right? i told you!
but wait! there's more tutorial!
some people find getting the snag into the needle threader to be a bit of a hassle, and i'm definitely one of them. depending on the weight of your sweater, it can be pretty darn fussy!
instead of a needle threader, you can also use dental floss threaders. i LOVE these, they're such a great invention. of course, i don't have braces, and i can floss using regular floss, but it's fabulous for crafty purposes! (i use them a lot to string beads on yarn for crocheting)
again, start with a snag (aren't i lucky that my sweater had enough snags to do this twice?!)
the floss threaders are easier to use because instead of trying to push the needle threader through from the inside, hoping you're in the right spot, you're going to push the hard end of the floss threader through the sweater from the outside. gently slide the end of the floss threader through right where the snag started.
again, fiddle with the snag and push it into the opening of the floss threader. it's a still a little bit fiddly, but since the floss threader had a much bigger opening, it's less fiddly than the needle threader.
done! again, you might need to gently tug the sweater fabric.
can you see where the snag was? it's practically invisible!
Saturday, March 21, 2009
Tutorial - mending t-shirt sleeves by shortening them - super easy!
March is Mending Month over at blog.craftzine.com, and i've really been enjoying the posts. Week 1 included patching a sweater sleeve, darning and hand sewing a blind hem. Week 2 included iron on patches (with really fabulous packaging!), fabric yo-yos to cover stains or holes on a skirt, and removing under arm stains. Week 3 has stylish stitches for mending jeans, a super cute moth hole fix for a sweater, and mending torn upholstery. you should definitely go check it out!
i have to admit that i don't do a lot of mending. it's not that i throw things out, it's just that i rarely need to mend things. i'm sure if i had kids i'd be mending a lot more (my brother was SO hard on the knees of his pants when he was little!). as it is, my "kids" just leave tiny little holes in my sheets as they chase each other across the bed and over me, but i ignore them, because they're just gonna do it again!(i think i'm officially the crazy cat lady now that i've called them my kids!)
but i do have a few mending jobs once in a while, and inspired by all the fabulous tutorials that craftzine has been posting, i decided to write up a tutorial last night as i did one of them. i'm going to do the second job later today, and i'll post that as well.
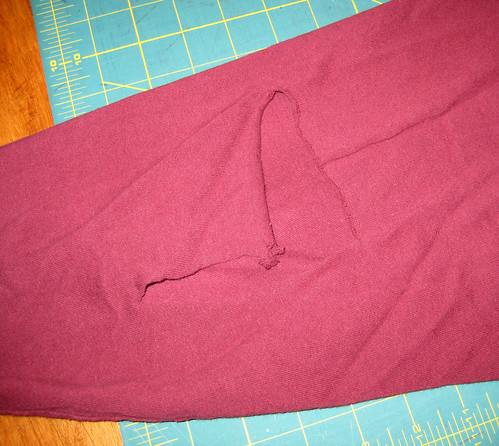
my sister asked me several weeks ago to fix her boyfriend's shirt. she sews just as well as i do, but used the excuse that she doesn't have a serger, so i had to do it. right. the tshirt is one of the typical Hanes style, ie: boxy with minimal stretch!
unfortunately, E's favourite long sleeve tshirt had a run-in with his washing machine, which resulted in a large L shaped tear on one of the sleeves. while i could have tried to mend the tear, it would have been visible no matter what, so he requested that the shirt be made into a short sleeved tee instead.
i took a look at a short sleeved tshirt in my closet, and made a note of the angle the sleeve was cut on. you don't want to cut the sleeve straight up and down perpendicular to the armhole, because you'll end up with sleeves that are short around your arm, and long underneath it! i used my cutting board and rotary cutter, but if you don't have one, scissors work just fine! i'd suggest you use a ruler and a chalk pencil though, to make sure that you cut in a straight line!
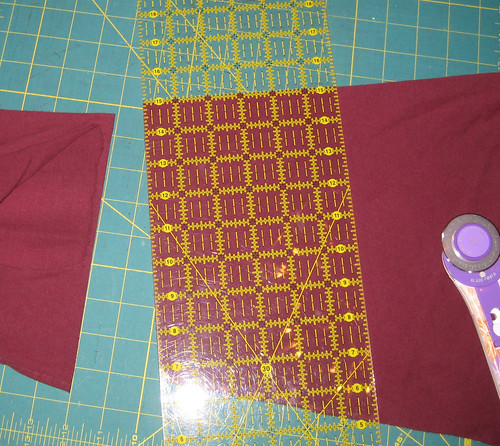
i then took the piece that i cut off and tried to use it as a guide to shorten the other sleeve too. oops.
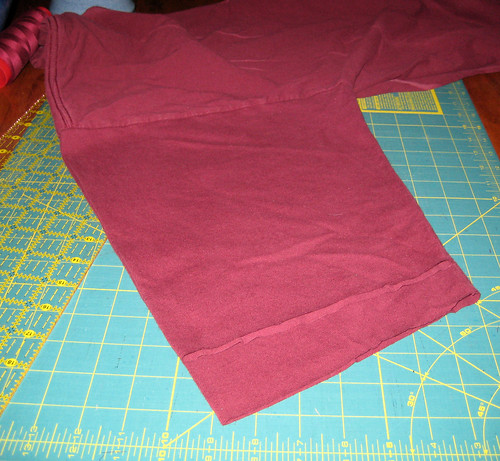
it's much more accurate to line up the shoulder and armhole seams on both sides of the shirt and shorten the other sleeve that way!
if you have a serger, now is when you'll serge the hem edge that you've just cut. use the stretch knit stitch if your machine has it, don't worry about it if it doesn't, because this style of shirt doesn't have a whole lot of stretch to it anyway.

if you don't have a serger, don't sweat it! you can leave the hem unfinished, since tshirt knits don't really fray, or you could zigzag the edges.
after you finish the hem, you'll want to press the sleeve. when working with knits, your steam iron is your best friend! your hem finish might have stretched the fabric a bit, and we don't want that, so use lots of steam!
let it cool a bit so that you don't burn your fingers (maybe that's just me!), and fold up the seam. take a look at the bottom of the shirt, and you'll see that knits generally have a fairly deep hem. i folded mine up about an inch, maybe a little less. pin like crazy! when working with knits, pins are your other best friend! (hopefully the pins and the steam iron don't get jealous of each other, that might get ugly...)
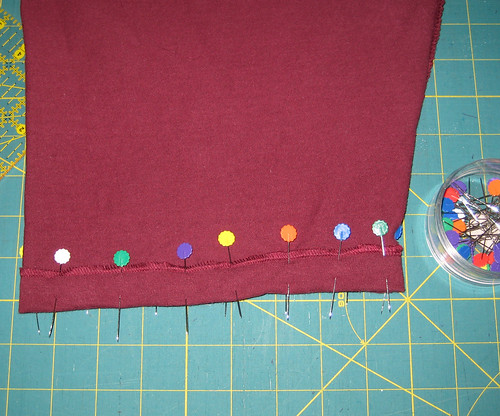
press it! remember the difference between pressing and ironing, that's especially important with knits that stretch if you pull the iron across them. i find it easier to press with the pins still in, but some people say that you shouldn't. i say that it depends on the fabric and the pins! these pins have flat heads, so they won't leave big marks in the fabric, and i know that this fabric is pretty forgiving, i'll be able to steam out any marks later. plus, and this is important, i've pressed things using these pins before, so i KNOW that they won't melt into my fabric!
i'm using a sleeve pressing board on top of my regular ironing board, so that i can rotate the sleeve around it while pressing. if you don't have one, that's cool, just use your regular iron board. (but keep an eye out at thrift stores and garage sales, cause they're super handy)
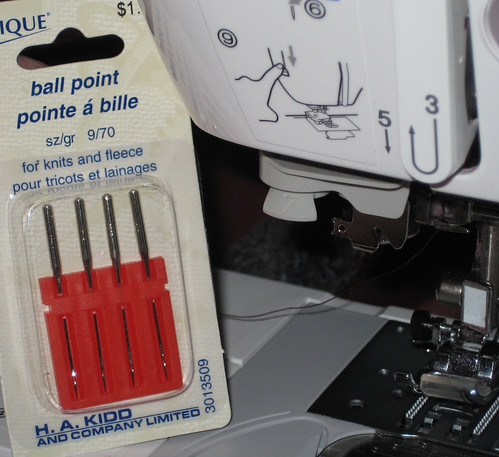
time to sew! i'm using a ballpoint needle that's a 9/70. i think the sizing is different for you americans, but the important thing is that you want a thin needle. this fabric isn't very thick, and i'm only sewing through 2 layers, so we don't want big holes. the most important thing is that i'm using a ballpoint needle. ALWAYS use a ballpoint needle when sewing with knits! sharps are, as the name says, sharp! they cut through the fabric fibers, which is fine for woven fabrics, but you don't want that for a knit. ballpoint needles are slightly rounded, so they'll slip between the fibers instead.
if your machine has a removable cover, remove it now! a lot of machines have a free arm once you remove the cover, which is great for sewing around things like sleeves.
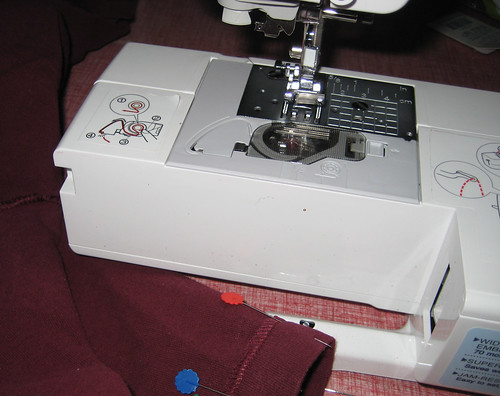
if you have a really old machine that doesn't have a free arm, it'll still work, it just might be a little bit tricky. don't poke yourself with the pins!
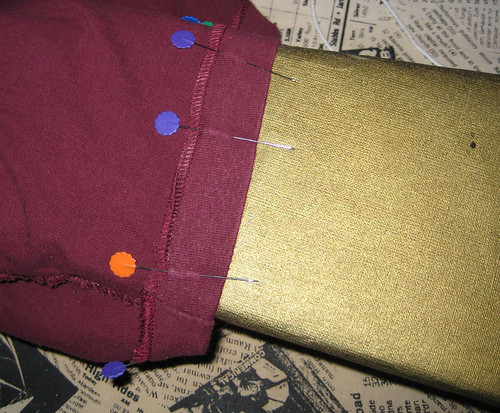
start sewing! line your needle up with the edge of the hem. you want to be close enough to edge to keep the hem from rolling inside the sleeve, but you also don't want to chance sewing off the edge either! it's good to pick a spot on your machine throat plate that you're going to follow, and if the needle isn't in the exact position you want when the edge is lined up with the throat plate spot, it's sometimes easier to just move the needle!
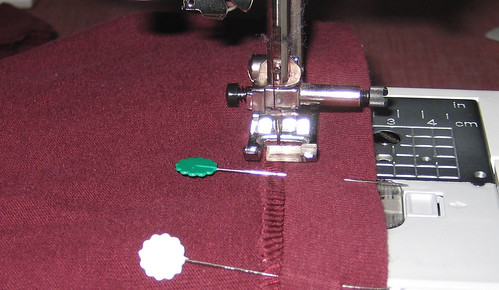
i'm sewing on the inside here, so that i can ensure that i catch the edge. you should have the same matching thread in both your bobbin and your needle, so this shouldn't matter.
if you look closely at the sleeve of your tshirt, or at the hem, you'll see that there are two lines of stitching. if you look at the back, you'll see that there's a zigzag sort of thing between the two lines. you can create that effect by using a twin needle, but the damn things are mighty expensive for just a mending job, so we're going to imitate the look instead.
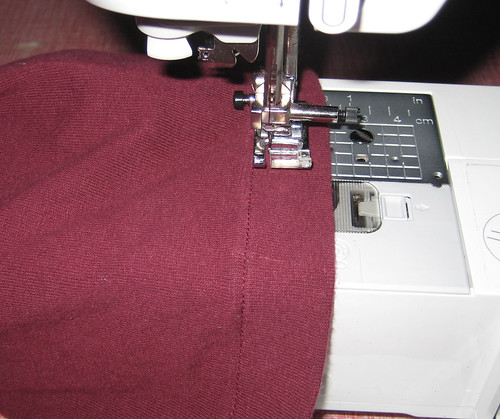
so turn the sleeve right side out! lay it on the machine, and line the edge of your presser foot up with the stitching you did in the last step. for this step we won't worry about following the lines on the throat plate, we want to follow the stitching only.
you're done! press the hem again, using lots of steam so that the knit will spring back into place. ta-da!
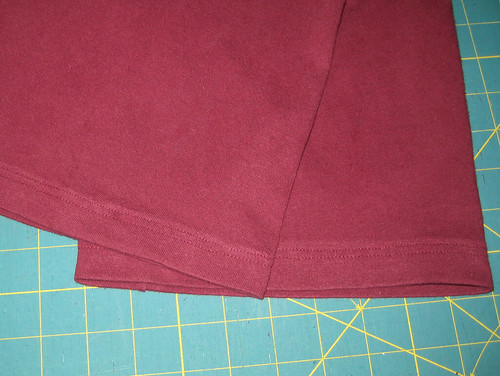
this is a great fix is you have shirts where the sleeve is too short too, you can easily make them into 3/4 length or short sleeves. if you're small, you might have clothes that are technically "children's", complete with slighter shorter sleeves, or you may just have long arms!
i have to admit that i don't do a lot of mending. it's not that i throw things out, it's just that i rarely need to mend things. i'm sure if i had kids i'd be mending a lot more (my brother was SO hard on the knees of his pants when he was little!). as it is, my "kids" just leave tiny little holes in my sheets as they chase each other across the bed and over me, but i ignore them, because they're just gonna do it again!(i think i'm officially the crazy cat lady now that i've called them my kids!)
but i do have a few mending jobs once in a while, and inspired by all the fabulous tutorials that craftzine has been posting, i decided to write up a tutorial last night as i did one of them. i'm going to do the second job later today, and i'll post that as well.
my sister asked me several weeks ago to fix her boyfriend's shirt. she sews just as well as i do, but used the excuse that she doesn't have a serger, so i had to do it. right. the tshirt is one of the typical Hanes style, ie: boxy with minimal stretch!
unfortunately, E's favourite long sleeve tshirt had a run-in with his washing machine, which resulted in a large L shaped tear on one of the sleeves. while i could have tried to mend the tear, it would have been visible no matter what, so he requested that the shirt be made into a short sleeved tee instead.
i took a look at a short sleeved tshirt in my closet, and made a note of the angle the sleeve was cut on. you don't want to cut the sleeve straight up and down perpendicular to the armhole, because you'll end up with sleeves that are short around your arm, and long underneath it! i used my cutting board and rotary cutter, but if you don't have one, scissors work just fine! i'd suggest you use a ruler and a chalk pencil though, to make sure that you cut in a straight line!
i then took the piece that i cut off and tried to use it as a guide to shorten the other sleeve too. oops.
it's much more accurate to line up the shoulder and armhole seams on both sides of the shirt and shorten the other sleeve that way!
if you have a serger, now is when you'll serge the hem edge that you've just cut. use the stretch knit stitch if your machine has it, don't worry about it if it doesn't, because this style of shirt doesn't have a whole lot of stretch to it anyway.
if you don't have a serger, don't sweat it! you can leave the hem unfinished, since tshirt knits don't really fray, or you could zigzag the edges.
after you finish the hem, you'll want to press the sleeve. when working with knits, your steam iron is your best friend! your hem finish might have stretched the fabric a bit, and we don't want that, so use lots of steam!
let it cool a bit so that you don't burn your fingers (maybe that's just me!), and fold up the seam. take a look at the bottom of the shirt, and you'll see that knits generally have a fairly deep hem. i folded mine up about an inch, maybe a little less. pin like crazy! when working with knits, pins are your other best friend! (hopefully the pins and the steam iron don't get jealous of each other, that might get ugly...)
press it! remember the difference between pressing and ironing, that's especially important with knits that stretch if you pull the iron across them. i find it easier to press with the pins still in, but some people say that you shouldn't. i say that it depends on the fabric and the pins! these pins have flat heads, so they won't leave big marks in the fabric, and i know that this fabric is pretty forgiving, i'll be able to steam out any marks later. plus, and this is important, i've pressed things using these pins before, so i KNOW that they won't melt into my fabric!
i'm using a sleeve pressing board on top of my regular ironing board, so that i can rotate the sleeve around it while pressing. if you don't have one, that's cool, just use your regular iron board. (but keep an eye out at thrift stores and garage sales, cause they're super handy)
time to sew! i'm using a ballpoint needle that's a 9/70. i think the sizing is different for you americans, but the important thing is that you want a thin needle. this fabric isn't very thick, and i'm only sewing through 2 layers, so we don't want big holes. the most important thing is that i'm using a ballpoint needle. ALWAYS use a ballpoint needle when sewing with knits! sharps are, as the name says, sharp! they cut through the fabric fibers, which is fine for woven fabrics, but you don't want that for a knit. ballpoint needles are slightly rounded, so they'll slip between the fibers instead.
if your machine has a removable cover, remove it now! a lot of machines have a free arm once you remove the cover, which is great for sewing around things like sleeves.
if you have a really old machine that doesn't have a free arm, it'll still work, it just might be a little bit tricky. don't poke yourself with the pins!
start sewing! line your needle up with the edge of the hem. you want to be close enough to edge to keep the hem from rolling inside the sleeve, but you also don't want to chance sewing off the edge either! it's good to pick a spot on your machine throat plate that you're going to follow, and if the needle isn't in the exact position you want when the edge is lined up with the throat plate spot, it's sometimes easier to just move the needle!
i'm sewing on the inside here, so that i can ensure that i catch the edge. you should have the same matching thread in both your bobbin and your needle, so this shouldn't matter.
if you look closely at the sleeve of your tshirt, or at the hem, you'll see that there are two lines of stitching. if you look at the back, you'll see that there's a zigzag sort of thing between the two lines. you can create that effect by using a twin needle, but the damn things are mighty expensive for just a mending job, so we're going to imitate the look instead.
so turn the sleeve right side out! lay it on the machine, and line the edge of your presser foot up with the stitching you did in the last step. for this step we won't worry about following the lines on the throat plate, we want to follow the stitching only.
you're done! press the hem again, using lots of steam so that the knit will spring back into place. ta-da!
this is a great fix is you have shirts where the sleeve is too short too, you can easily make them into 3/4 length or short sleeves. if you're small, you might have clothes that are technically "children's", complete with slighter shorter sleeves, or you may just have long arms!
Friday, March 20, 2009
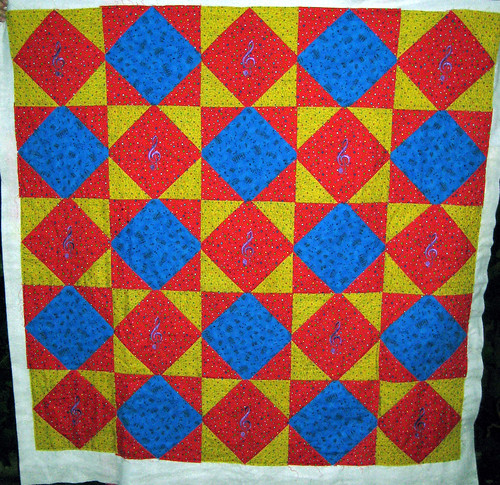
machine embroidered music baby quilt!
in the fall of 2007, i heard a rumour that a friend from high school was pregnant. we've lost touch over the years, but at one point, she was one of my closest friends and i really wanted to make something for her/her baby. i went searching for fabrics, specifically wanting a fabric that was music print. at that point i didn't know if she was going to have a boy or a girl, and i didn't know if her husband (who i've never met) was the type to be anal about "boy" colours and "girl" colours, so i went with the basic primaries.
i didn't get around to starting work on the quilt until august, when i did it as part of the Brother machine embroidery campaign. the mom is a musician and a composer who teaches piano and plays both piano and trombone beautifully, so i'm certain that the baby is going to grow up in a music loving household. i found a music themed embroidery card, and the treble clefs on it were perfect for the quilt.
to start, i preshrank the fabric. i don't usually do that with quilts (which is debatable -- some people say you HAVE to, and some people say you NEVER should!), because i rarely use light fabrics where i'd have to worry about bleeding, and i really like the wrinkled slightly vintage look that quilts get when you wash them after quilting. but since i was embroidering on the blocks, preshrinking was a must!
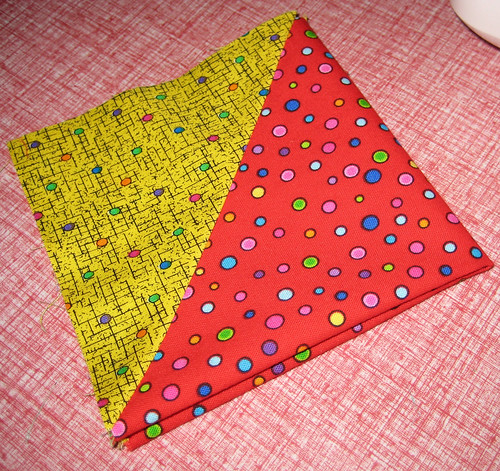
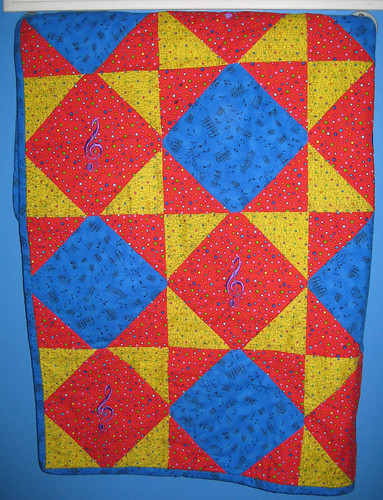
i chose a square in square block design and got started cutting. i quickly realized that i didn't have enough fabric for the larger quilt that i'd planned -- oops. i recalculated my blocks, and decided to go with 5 across and 5 down. one of the really nice things about this pattern is that you can make the blocks any size you like, and i chose 8 1/2" blocks, making a quilt that's about 43" x 43".
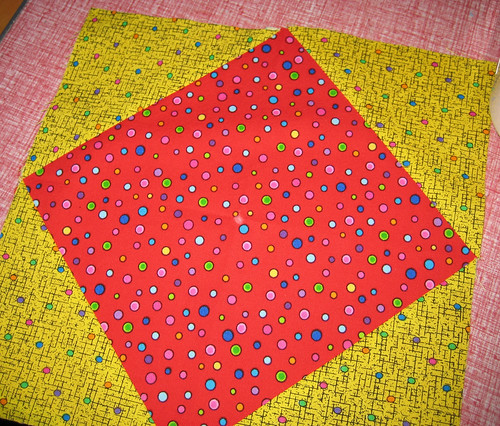
after the blocks were sewn and pressed, i went about folding them into quarters and marking the centres.
i used the guide for my hoop to match up the centres when I stretched the blocks with the tear away stabilizer,
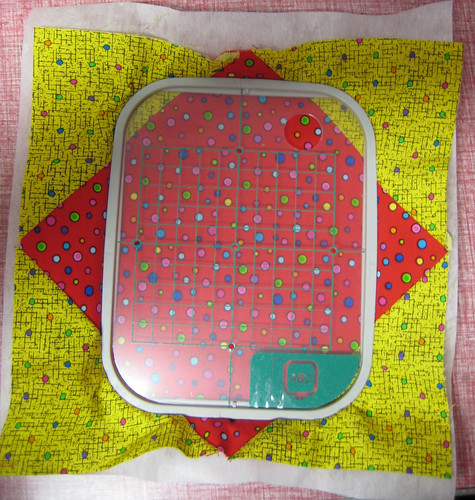
and then, because i'm paranoid, i also lined the centre marking up with the needle as well.

once I'd embroidered the centre of all the red squares, i pieced the quilt squares together. please note that patchwork is apparently NOT my forte! my squares don't match nearly as well as they should.
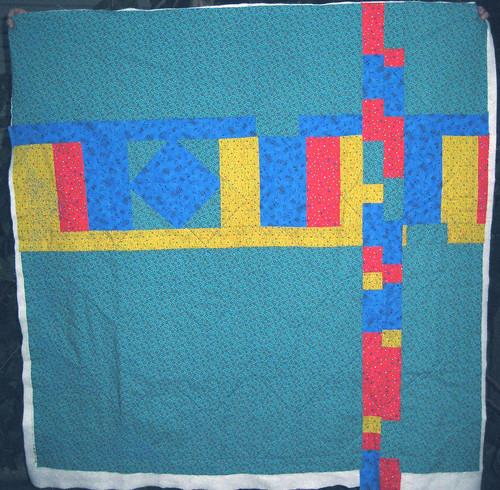
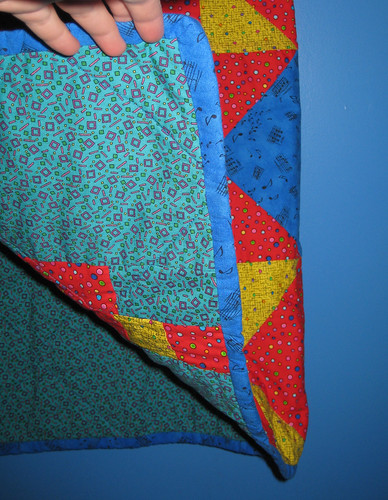
at that point i realized that i really didn't have enough of the backing, so i started piecing that as well. i did three long strips across the back, two really narrow and simple and one wider, with a square in a square block, and then i did two skinny strips going down the quilt, along the same lines as this tutorial. i really love how it turned out - the back suits my personal taste more than the front! (the front squares turned out a bit more traditional looking than i was expecting - i don't know why i didn't realize that they would!)
i layered the front and back with batting in between, pinned, and then started stitching in the ditch. i stitched in the ditch around each diamond square (the red and the blue) because i really wanted them to be the focus of the quilt, and then i decided to fill in the rest with stippling.

i got started on the stippling, but ran out of time.
and that's as far as i got. it sat in a box for months, i was totally unmotivated. i used to do a bit more quilting/patchwork, but i've never been good at actually completing them, they just take so damn long! i always end up thinking "but i could be making so many new skirts or bags in the same amount of time..."
it was already late when i started it, so by this point the baby it's for is almost a year and a half old, and i'm STILL dragging my feet about finishing it. luckily, Toronto Craft Alert did a giveaway called "Get 'Er Done" (i posted about it before!), which totally motivated me to get my butt in gear! i didn't win the amazing prize package, but at least it's done, and the recipient hasn't even started school yet (i was worried it would take me that long!).
first, i decided that i didn't like the stipling, and that there was no way in hell i'd ever be able to motivate myself to finish it. i didn't like how stiff it made the quilt, it didn't feel cozy enough to me. so i hauled out my trusty clover seamripper (LOVE that thing!) and started at it. luckily, my stitches were a little big in some places, which made the ripping out easier, but it still took forever though, or at least my back thought so!
after i'd ripped it all out, i cut, seamed and pressed the binding, and machine stitched it onto the quilt. i cut off the extra batting and backing, and hand stitched the binding down, using very tiny stitches, because i figured it needed to be sturdy for a soon to be toddler!
DONE!!!! huraayy!!!!

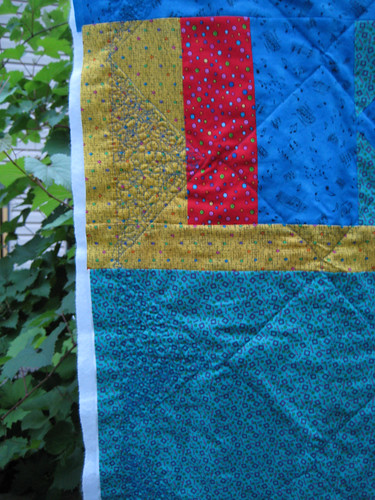
i bound the edges in the same blue music fabric that is used in the blocks.
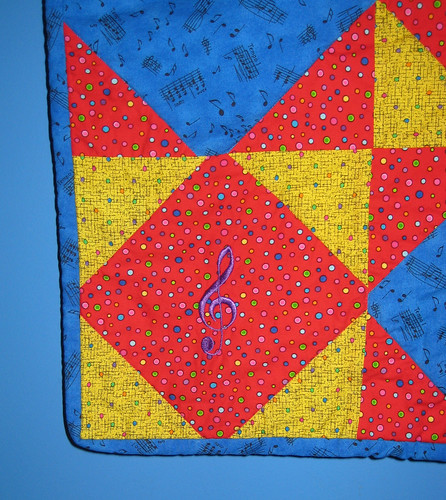
closeup of the squares. i obviously suck at both matching up seams and mitering corners, and of COURSE the most obvious mistakes are in the corner where i took the picture! this quilt was put together really really quickly because of the time constraints of the campaign, so it's even worse than it would be normally in terms of matching up. but i think they'll still like it.
now i just need to get my butt in gear and actually mail it sometime soon....
i didn't get around to starting work on the quilt until august, when i did it as part of the Brother machine embroidery campaign. the mom is a musician and a composer who teaches piano and plays both piano and trombone beautifully, so i'm certain that the baby is going to grow up in a music loving household. i found a music themed embroidery card, and the treble clefs on it were perfect for the quilt.
to start, i preshrank the fabric. i don't usually do that with quilts (which is debatable -- some people say you HAVE to, and some people say you NEVER should!), because i rarely use light fabrics where i'd have to worry about bleeding, and i really like the wrinkled slightly vintage look that quilts get when you wash them after quilting. but since i was embroidering on the blocks, preshrinking was a must!
i chose a square in square block design and got started cutting. i quickly realized that i didn't have enough fabric for the larger quilt that i'd planned -- oops. i recalculated my blocks, and decided to go with 5 across and 5 down. one of the really nice things about this pattern is that you can make the blocks any size you like, and i chose 8 1/2" blocks, making a quilt that's about 43" x 43".
after the blocks were sewn and pressed, i went about folding them into quarters and marking the centres.
i used the guide for my hoop to match up the centres when I stretched the blocks with the tear away stabilizer,
and then, because i'm paranoid, i also lined the centre marking up with the needle as well.
once I'd embroidered the centre of all the red squares, i pieced the quilt squares together. please note that patchwork is apparently NOT my forte! my squares don't match nearly as well as they should.
at that point i realized that i really didn't have enough of the backing, so i started piecing that as well. i did three long strips across the back, two really narrow and simple and one wider, with a square in a square block, and then i did two skinny strips going down the quilt, along the same lines as this tutorial. i really love how it turned out - the back suits my personal taste more than the front! (the front squares turned out a bit more traditional looking than i was expecting - i don't know why i didn't realize that they would!)
i layered the front and back with batting in between, pinned, and then started stitching in the ditch. i stitched in the ditch around each diamond square (the red and the blue) because i really wanted them to be the focus of the quilt, and then i decided to fill in the rest with stippling.
i got started on the stippling, but ran out of time.
and that's as far as i got. it sat in a box for months, i was totally unmotivated. i used to do a bit more quilting/patchwork, but i've never been good at actually completing them, they just take so damn long! i always end up thinking "but i could be making so many new skirts or bags in the same amount of time..."
it was already late when i started it, so by this point the baby it's for is almost a year and a half old, and i'm STILL dragging my feet about finishing it. luckily, Toronto Craft Alert did a giveaway called "Get 'Er Done" (i posted about it before!), which totally motivated me to get my butt in gear! i didn't win the amazing prize package, but at least it's done, and the recipient hasn't even started school yet (i was worried it would take me that long!).
first, i decided that i didn't like the stipling, and that there was no way in hell i'd ever be able to motivate myself to finish it. i didn't like how stiff it made the quilt, it didn't feel cozy enough to me. so i hauled out my trusty clover seamripper (LOVE that thing!) and started at it. luckily, my stitches were a little big in some places, which made the ripping out easier, but it still took forever though, or at least my back thought so!
after i'd ripped it all out, i cut, seamed and pressed the binding, and machine stitched it onto the quilt. i cut off the extra batting and backing, and hand stitched the binding down, using very tiny stitches, because i figured it needed to be sturdy for a soon to be toddler!
DONE!!!! huraayy!!!!
i bound the edges in the same blue music fabric that is used in the blocks.
closeup of the squares. i obviously suck at both matching up seams and mitering corners, and of COURSE the most obvious mistakes are in the corner where i took the picture! this quilt was put together really really quickly because of the time constraints of the campaign, so it's even worse than it would be normally in terms of matching up. but i think they'll still like it.
now i just need to get my butt in gear and actually mail it sometime soon....
Subscribe to:
Posts (Atom)