i used the tecnique on the tip in page i just posted, and i've been playing around with it a bit more since. i'm really loving the effect it creates.
i really wanted to try it with crayola washable markers. i used to get really good results in my sketchbooks by colouring the edges, etc, then wetting them, it looked very watercoloury. so tonight i hauled out all my markers (really, who knew i had so many), tested them all, and started playing.
i used the markers to colour the stamps, then i sprayed the water and stamped them. oohh, they worked SO WELL! i love the colour depth i'm getting. the great thing about them is that it's much easier to layer colours and put them specifically where you want them on the stamp (and you don't accidentally dye your ink pad another colour!) i played around with my mary lino i carved, which was mediocre, because the carving material really doesn't hold the ink very well (i found that when i was stamping with it before), and with rubber stamps, which worked pretty well, but work best when the stamp isn't too detailed, and with some of my clear stamps, which worked quite nicely, again provided they weren't super detailed, and then i hauled out a few of those cheapy hard sponge stamps. they worked wonderfully, they really pull the ink in, so when you spritz it, you don't wash out the colour, and you get really deep prints. and they're by design less detailed than the rubber stamps. they do take multiple rinsings to get the marker ink out though!
it also works cool to stamp the image onto the paper, THEN spritz it. or, ink, spritz, stamp, then spritz again, you can control where the excess ink goes on the paper by angling the spray. and it's cool if you ink, spritz, stamp, then use a cloth to wipe off any excess ink, it really makes it look washed out and old.
all my attempts are drying right now, but i'll scan them and post them.
things to remember if you're trying it -
* go to the dollar store or something and buy a travel cosmetics spritzer. the larger ones they sell for ironing/gardening, etc are too big, and the mist isn't delicate enough.
* layer your ink colours accordingly! start with the lightest, and work your way darker, so you don't stain your ink pads or your markers!
* the dye based inks and the markers are technically washable, but you need to wash your clothes quick if you drip on them!
in other news, i made something cute the other night that i can't post until it's received.... and i made a whole bunch of valentines, that again, i can't post until they're received... and i made a prego top that i can't post til it's received! they should show up quick though, i mailed them from the US to US addresses...
and my valentine swap stuff should arrive tomorrow (it damn well better, canada post!), so i'll be able to post that stuff soon.
i've also finally cleaned up my sewing room/studio enough to USE my table! this is VERY exciting, and was only accomplished with much appreciated help! everything in my studio is now organized into bins. the bins are taking up almost the entire floor, as they wait for me to go through them and weed out anything i don't want to keep (they'll be going into crawl space after that's done), but in the meantime, i can actually work in there! my table is clear, i can access stuff (once i climb over the bins), i actually know where things are... it's heaven, really. i went out and bought curtain rods last week, once the bins are dealt with, i'll make curtains, and then start hanging the rest of my artwork and shelves. this is the closest my studio has EVER been to clean!
to celebrate the fact that i can now use my rotary cutter again (since i have a table to use it at!), i finally got started on my blocks for the quilt block craft-a-long that started in september on craftster. late, yes, i know!
i've never been big on quilt blocks. when i make quilts, i'm ALL about strip piecing! so i really wanted to challenge myself to make some blocks, i hadn't made any since i made a few potholders about 7 years ago!
i hemmed and i hawed about my fabric for the project for a long time. i needed to have enough for them all, if i wanted them to tie together in a finished piece, nd i needed enough variety for the blocks that require more than 4 or 5 colours.
my lovely friend joanne gave me a bunch of quilting cotton several years ago and i kept it thinking i could at least use it for purse linings if nothing else, but i kept hesitating at actually using it. the other night i came across it, and realized it was perfect for this project. i have a whole bunch of colours of it, and it's varigated, the colour changes across the width and goes back to the same at the other end. i like how it's not super high contrast, because i'm not usually into block designs, i'm more doing it for the challenge than anything else.
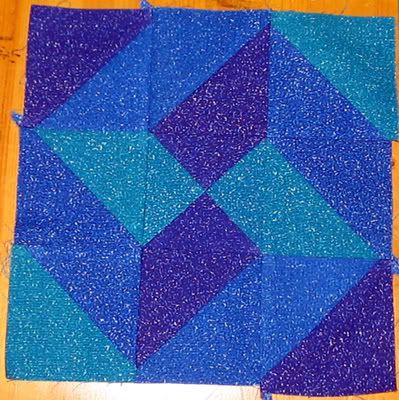
so, this was my first block, the wandering star.
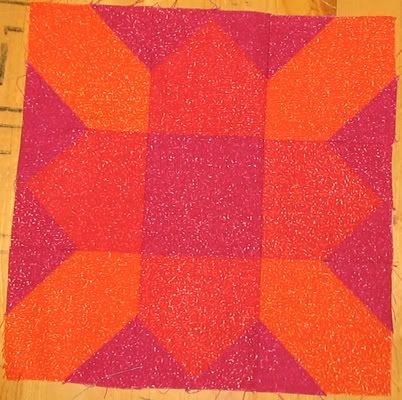
then i did the prairie flower (i like how it's actually the colours of a prairie flower, the tiger lily. that was a fluke, by the way!)
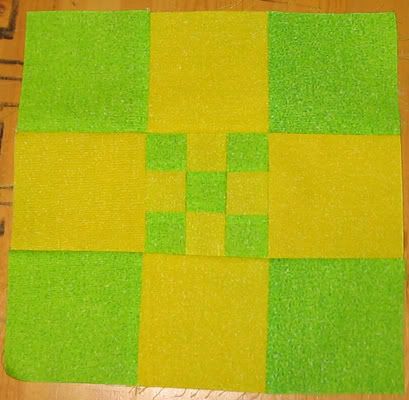
and then i did the dutch nine patch. i like this one less, because the colours are more contrastly, but oh well.
i still have LOTS of blocks to go, but i'm glad i started on them, and so far, i'm pretty damn proud of my corner matching!
for the first one, i totally forgot about this technique i learned years ago, and i ended up with quite a little pile of cut threads! luckily, i remembered it when i sat down to do the next two a few days later.
i don't know the name of it, and it's probably general knowledge to most people, but just in case it can help a newbie or something, i took pictures.
in patchwork (at least the way i was taught), you don't generally backstitch at the seams, you just use a fairly small machine stitch. sometimes the machine grabs at the beginning of your seam and makes it messy, fraying the cotton a bit.
if you start and end all your sewing with little scraps, you can prevent this from happening, and as a bonus, you save a lot of thread!
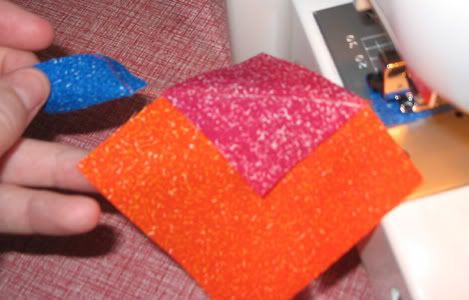
so with this one, i had the little blue pieces left from my first block that i was using at the beginning and end of each seam. i sewed to the edge of the first blue block, then butted the pieces i was sewing right up to edge of it and kept sewing, and when i got close to the end, i butted another blue piece up to the end. i left the blue piece in the machine with the needle in it, ready for my next piece to sew.
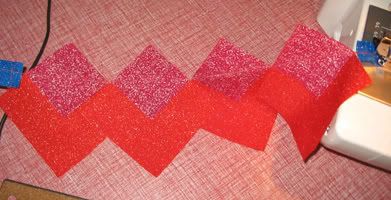
sometimes you can just butt up the pieces themselves, there's no reason to use a scrap piece between each.
i'm so happy that i remembered that!

No comments:
Post a Comment