
first of all, i need a new bag. i really NEED a new bag! remember the shiny blue and glittery purple bag that i made myself for the vancouver handmade nation premiere? way back in july 2009? yeah, it's busted. i replaced the straps in the spring of 2010, because the vinyl had ripped entirely, and when i did that, i threaded thin strapping through the new ones, to add strength. the vinyl has ripped again, and the bag is only being held up by the strapping. plus, it's gotten a bit scuffed and stuff, since i've been using it almost constantly for more than 2 years. once i make a new one, i'll take it apart to scavenge what i can from it, like the handprinted lining.
i bought some Ruby Star Rising specifically to make a new bag, but of course, i'm hoarding it and scared to cut into it until i know for sure that it's the right project.
i've been looking around for a good pattern to use - i don't think i've ever used a pattern for a bag, i always just make them up myself, but there are so many neat patterns out there that i was intrigued. i've been eyeing the Noodlehead 241 tote, because i think it would be a good showcase for the RSR prints, but i realized that it was too small. i'm still contemplating enlarging it, but we'll see.
in the meantime, Craft Buds has been doing Craft Book Month for the month of September, and let me tell you, ohmygoodness do i have craft books! i decided that their challenge was a good motivation to try some of the bag patterns in the many many books that i have. for their challenge, i could have used a project that i'd already made, like the bibs and pillow from Doodle Stitching, by Aimee Ray, or the quilt that i made from Elizabeth Franson's book, Practical Guide to Patchwork, last winter
but then last week's Iron Craft challenge was "Hold it" - open to interpretation, but most obviously a bag challenge! definitely a sign that i should get moving on a new bag.
so i spent a few hours going through a whole bunch of my books and made a list of my options. i decided to make The Everything Tote from Weekend Sewing by Heather Ross first. i wasn't sure that it would be a good pattern for an everyday bag, but i thought that it would be good for carrying quilts around, and i was hoping that it might prove suitable for carting a load of laundry.
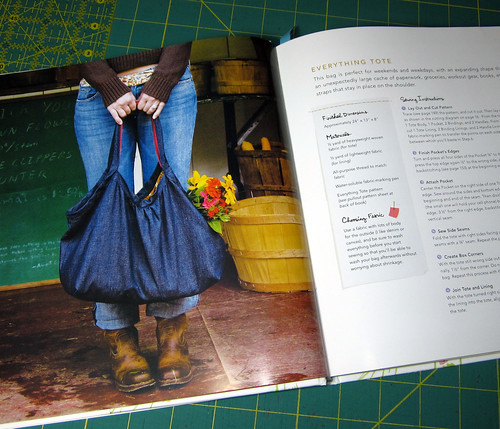
cute, right? to tell you the truth, i didn't look at the fabric requirements very closely. i decided to make it out of vintage sheets, since it was technically a sample, and it looked like it would take a lot of fabric, given the size. if i HAD looked at the fabric requirements, it would have been a good indicator of what was to come - they were wrong anyway.
i didn't google the book, or any of the patterns in it, before i started working on it. it didn't even occur to me. it's a beautifully photographed and styled hardcover book - wouldn't all the information required be in it? after all, if i wanted to search the internet for info, i might as well just use one of the online patterns or tutorials that i have bookmarked.
so i started on the bag. all of the patterns are printed on a large folded sheet of paper adhered to the inside of the book. they all overlap each other, but each pattern is a different colour, so it's fairly easy to see which lines to follow. you need to trace the pattern out onto other paper, but that's not a big deal, and it's definitely preferable to books that require you to go to a copy shop and enlarge them.
i didn't actually trace out all of the patterns because other than the bag itself, the patterns were all rectangles. instead, i measured the rectangles and used my rotary cutter and ruler.
the pattern calls for the straps and the front binding to be cut on the bias. it doesn't say why, and honestly, i don't know what the justification was. fabric cut on the bias is generally stretchier - but you wouldn't want straps to be stretchy, really. i wondered if the pattern is designed to be bias because you're applying it to curved areas - but the way the pattern is written, the bias strips are sewn together before they're applied to the curves, so you loose all the benefits of a bias anyway.
but i was determined that i was going to follow the pattern the way it was written (because i never do that!), and since i had plenty of fabric, i did as i was told and cut the strapping and binding on the bias.
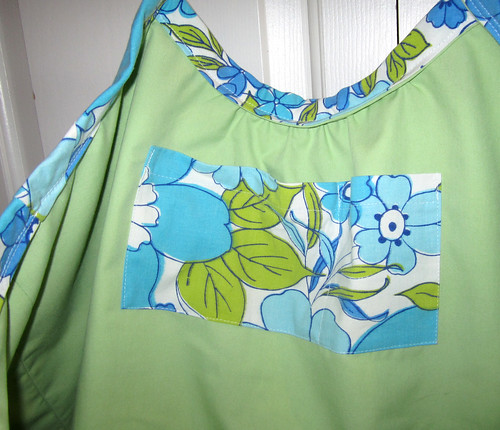
i started sewing the bag together, and it came together nicely. it's a fairly basic pattern, with boxed corners, and a simple body structure. since the edges are bound in the last few steps, it's super easy to add the lining. i didn't follow the instructions for the pocket exactly, because it said to apply it 2" below the raw edge of the lining, and that seemed awfully close to the top of the bag, so i lowered it a few inches.
then i basted the bag and the lining together, and got ready to start on the binding and the straps.
and that, my friends, is where the problems began. the pattern calls for the binding and straps to be lined. i understand part of the strap being lined, because you can see the lining on the over the shoulder portion of it. but why line the part that's attached to the bag itself? and why line the binding across the front and the back? but i did it anyway, because i was following directions.
and then it got even more confusing. the instructions tell you to lay the binding down, right sides facing, and stitch. then you fold it over, and stitch it again. basically, just like a quilt binding. but with way too many layers of fabric, and seam allowance bulking things up right where you're supposed to be folding it over. i read the instructions over and over, because the way it's written will give you a very narrow binding. and if you look at the picture earlier in this post, that bag doesn't have narrow binding, it has wide binding that is scale to the size of the bag. i was getting really frustrated, and starting to think that i'd completely lost my ability to read patterns!
i decided to veer off from the instructions, and to apply the binding with just the single fold along the top of it, because i couldn't see how else i could get it to actually look like the picture. i basted the inside binding in place, folded it over, and topstitched through all the layers. i did a double line of stitching to make it super neat and tidy. my binding, that i'd cut to the pattern dimensions, was longer than it needed to be, but that was easy to trim, and wasn't a big problem in the grand scheme of the bag.
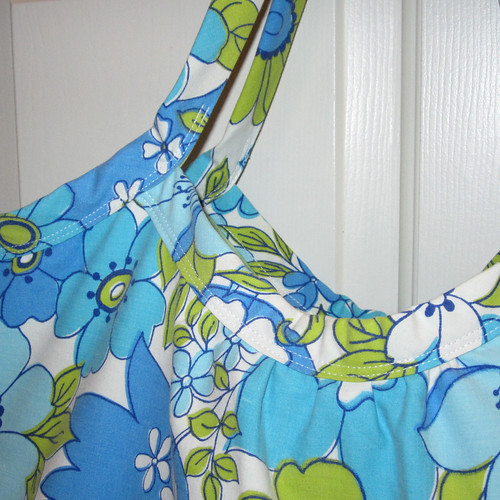
you're instructed to sew the strapping pieces onto the bag the same way that you sew on the binding, starting stitching 1" from the bag body on each side. that leaves the straps unfolded, and therefore wider and comfier than if they were narrow. that makes sense. but the way you sew it on, with all those extra folds? that doesn't make sense. at this point you have even more layers to sew over, since you have the bag body and lining seams as well. the pattern calls for a heavier weight fabric for the exterior of the bag, and i used a sheet - a heavier weight sheet than a lot of them, but not as heavy as twill or anything like it. and in addition to that, the strapping is two pieces, that you overlap (more layers!) and handsew as the last step. why? why not just sewn them together into a big loop and apply it that way? i thought that the handsewn way looked bulky and slightly sloppy, so i sewed my strapping pieces together. it was a bit harder than it had to be, because i'd already lined them, but i managed. and then i applied the strap portion the same way that i applied the binding.
and it was done. hurray, it was done!
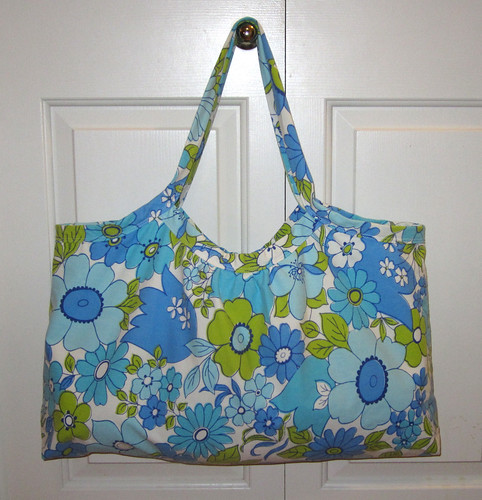
it took me about 4 hours to make this bag, plus a bunch of pinning time for the strap that i did in front of the tv. i realize that my sewing is not as fast as it used to be, but still, it seemed like a long time for such a simple bag. there was a lot of effort spent on pressing the straps so that the lining wouldn't show (do you know a trick for that? i don't remember it being that difficult!), and a lot of time spent re-reading the pattern and thinking "WTF?"
i mentioned the other day that i've been having a hard time with motivation, and that's true. in addition to that, every project i've started has been very frustrating. i was originally going to make a stuffy for the Craft Buds challenge, but that turned out even more miserably (stuffy making has never been my area of expertise, but still, i don't know what went wrong!). by the time i finished this bag, i was feeling pretty discouraged.
but then i came online, and realized that everyone had problems with it. and not only did a lot of people have problems with the Everything Tote, a lot of people had problems with everything in the book! i found quite a few reviews of this bag, there's this one, this one, this one, and this one. and the Amazon reviews are awful - there are more 1 and 2 star reviews than there are 4 and 5 star reviews, and the 4 and 5 star reviews seem to be from people who haven't actually tried to MAKE anything from the book!
there's a flickr group dedicated to Weekend Sewing, and their group conversations have a ton of info about the errors in the book. from what i've been reading, there used to be a web page or a blog post on Heather Ross's site where people posted corrections as they came to them, but that info has all been removed. it's been replaced by a very brief errata - that's still wrong! it still has the incorrect fabric requirements for this bag - though it's a different incorrect requirement (the book said 1/2yd each of two fabrics, the errata says 1yd each of two fabrics, reality requires 1 1/3yd each of two fabrics to accommodate the bias strips). the members of the flickr group have created their own errata, and it is much more detailed than the one provided by Heather Ross.
so. all in all. i like the bag. i wish i had made it a little bit deeper - it holds a smaller load of towels, but not a full load of clothes, and i'll probably continue using my cherry vinyl bag for carting quilts around, because i discovered quickly that i prefer something than can be zipped closed. there are other projects in the book that i like, and that i'm interested in making, but i will be very sure to check the errata before starting another project, and i don't think i'll make any of the clothing in it - for one, a lot of the items are rather baggy and shapeless, most attractive on a very angular, hanger type body, which i'm not, but also because i really don't trust that the sizing will be at all accurate.
overall, this was frustrating. Heather Ross is a designer that i really like, and the book itself is beautiful, full of mostly lovely projects, but there seemed to be no technical editing done at all, and the instructions for many of the projects seem clunky and illogical, as if someone without much experience sewing designed them. i honestly don't see how these patterns could have ever been tested without the errors being discovered. i don't know why this is. has the trend for craft books created such a rush to print them that there's no time for testing? i'd rather wait a few months more. testing could even be done as a marketing ploy - have bloggers test the patterns, and then when the book is released, have the bloggers show off what they made during the blog tour. makes sense to me!


6 comments:
Wow, what a nightmare! I did get this book from the library once, but didn't make anything with it. I also ran across the bad reviews on Amazon and decided not to buy it. I'm glad you finally figured it out in the end! The bag looks great--and oh, does it have a story. :) Thanks for linking up at Craft Buds!
Way to plow through and complete that big bag!! Good thing you didn't cut into your coveted RSR. I've been following the One Yard Wonder sewalong on Pink Chalk Fabric's blog and it seems like 50% of the projects in the book have errata. I can see a few in every book, but every second project? That's crazy. I think you are right...maybe books are too rushed and designers who are graphic artists, but not necessarily sewists, don't have experience writing up technical instructions. It's a bummer to pay $40 or $50 for a book full of mistakes!
Your bag is gorgeous, and I'm glad you dug in and finished it. It's hard when a project is frustrating. I am in the middle of one now and it's all I can do to pick it up and work on it. I just want to toss it. Glad you got a finish out of it though - maybe the next one will be easier!
I think two years is a decent lifespan for a bag. Very good that you stuck to making the new one! Looks good.
I like how your bag turned out, but what a pain! Sorry the instructions were so inaccurate! I really can't believe they can get away with poor patterns in published books, but it looks like they can all the time.
I love your fabric choice. I have this sheeting myself and plan to make an apron out of it. I am so glad I found this post before I started sewing this bag. I have the pieces cut out and was totally expecting to throw this together in a couple of hours. Not so I see. I have run into similar problems with One Yard Wonders. Great photos, ideas and terrible directions. Thanks for this post and your bag looks super!
Post a Comment