Tuesday, December 29, 2009

i am a genius! or, an easy and cheap way to prevent shirts from falling off the hangers

i hope everyone had a good holiday season, and i'm definitely looking forward to posting many pictures of my decorations and crafty xmas projects, but i had a brainstorm this evening,and i just have to post it first!

as a fat person, and as a person with a somewhat irrational hatred of crew necks, i'm constantly fighting with hangers to keep my shirts held up.

(i don't understand why clothes come in different sizes, but hangers don't. wouldn't it make sense that fat person = bigger garment = bigger neckline?)

i know that you can buy those pretty velvety hangers or fancy wood ones with indents for the shoulder seam, but dude, they're pricey, especially if you're like me and hang up every single garment that you own. (drawers are magic for me - once i put something in a drawer, i immediately forget i own it, hence hanging everything up)

and you know, i actually LIKE wire hangers. despite stereotypical gay men on make-over shows ranting about how terrible they are, i think they're much more logical than wood hangers. wood hangers take up too much space! my closet is full enough, if i was using wooden hangers for every top i owned, i'd need two more closets! and they're cheap! and easily accessed! and they all look the same! you won't buy a bunch of them, then buy more clothes and try to get more matching hangers, only to find that they've been discontinued.

i've thought of a few options before: clothespins, which then leave an indent on the garment, velcro, which would rub on the garment and might snag it, very gently sliding the hanger with the shirt into the closet, then hoping that the sheer mass of items in the closet will keep it on the hanger.

or there are always those yarn covered hangers, the type sold at craft fairs continent wide. i contemplated making some, but decided it would take way too long to crochet or knot yarn around every hanger in my closet. then i thought about using a wide zigzag stitch and sewing yarn around the hanger, but decided that it might leave fluff on the shirt. since i'm completely lazy and don't bother to turn shirts right side out before hanging them up, that would be a pain in the butt.

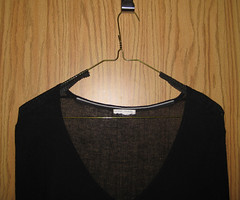
so i've pretty much resigned myself to this -
a
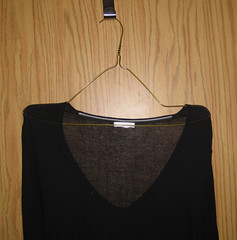
a closet full of severely bent and mangled hangers, just to keep my shirts off the floor.

but no more!

today i was driving along and this popped into my head -
1
shelf liner! you know, that non-skid stuff that you use in the bottom of a drawer, or on the counter of an RV, or under your sewing machine when you're sewing super fast. (what? that doesn't happen to you?)

so i detoured to the dollar store, and picked up a roll of it for $1.12 with tax.

i came home and started experimenting.

2
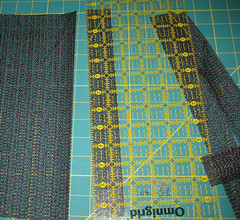
i cut strips of various widths and tested them. 1" is just a bit too narrow, and 1 1/4" is still a bit fiddly, but 1 1/2" was perfect. the width needed will depend on the size of your sewing machine foot, but i honestly wouldn't try to machine sew this without a teflon foot.

i freaking LOVE my teflon foot, it's actually starting to wear out a bit because i use it so much. it's definitely a sewing necessity in my book. you can buy them from sewing machine stores, or you can buy them online. i got mine here, and it was about $10. you can also buy teflon tape for about $1 in hardware stores, it's used in plumbing, and attach it to the bottom of a foot you already have, though that probably won't last as long.

this project would also be SUPER easy to hand sew, and honestly, still pretty quick. you don't need tiny stitches, i used a 5.0 stitch length on the machine (basting length), and larger hand stitches would be fine. you won't even need to pierce the liner, because it has holes built right in - you could even use a cross stitch needle and some embroidery floss!


after you've cut your strips, cut the strip in half lengthwise.
3
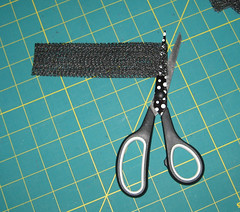
the liner i bought was about 12" wide, so i ended up with 6" strips once they were cut in half. you could cut these in half again, and it would probably work just as well.

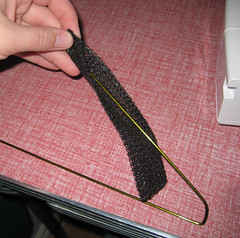
wrap the strip around the shorter upper edge on one side of the hanger. pins really aren't needed, because this stuff sticks to itself a bit.
4

move your needle as far to the side as it will go, and slide the top of the strip under your presser foot. like with any difficult fabric, it works better to start about 1/2" in, then backstitch. it doesn't "eat up" the fabric as much that way.
5

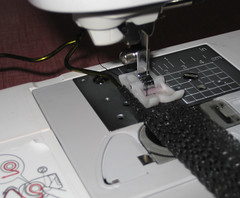
stitch all the way along the strip. you can see that there's quite a bit of seam allowance here, i found that the liner fed through more evenly when the strip was wide enough to sit over both feed dogs, so i purposely cut it wider than technically needed. you can always trim the seam allowance if that bothers you.
6

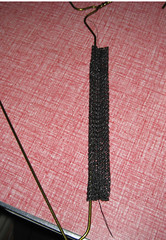
do the same on the other side, and you're done! super speedy!

7
doesn't that look better than the mangled hanger at the top of the page?


i managed to get 40 hangers out of my single roll, enough for all of my long and short sleeved tees. (that's kind of excessive, huh? i should clean out my closet! and yes, they're almost all black!)
8
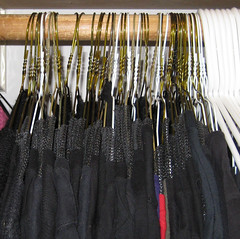
if you cut your strips into 3", you'll obviously get more. i wouldn't get 40 out of another spool, because a few of the hangers were using the too narrow 1" strips, but you still get a lot of value out of the $1.12!


so, what do you think?


(also, i've used smaller pics than usual - don't forget that you can click on them to see them bigger!)

Saturday, December 12, 2009

update!

i can't believe we're less than two weeks away from christmas!

i'm so excited, i love christmas. it's the most drag queeny holiday of the year, the perfect excuse for glitter and glam, which is totally up my alley.

and it's also an awesome excuse for crafting, and as usual, i've planned more crafting than i have the energy for (you'd think i'd get used to this by now, but i still expect myself to do the same amount as i could 5 years ago!).

since i've been working, it's taken me so much longer than i had hoped to finish putting the apartment together - the kitchen's barely been touched at all, and i'm still missing curtains in the bedroom, i still need to paint shelves, etc, etc!

i had decided that i'd have the house done by december 1st, and i'd start xmas decorating then, but of course, that didn't happen. the house wasn't done, i didn't have the energy, my back hurt to much to get the decorations out of storage....

so yesterday i finally hauled the rubbermaids out and packed them into my car. they were incredibly light, since they're mostly just glass ornaments, but all the bending and such pretty much wore me out. i was so impatient to start putting things up as soon as i got home!

so far i've sorted all the ornaments into piles for each tree, and i've assembled one and a half trees. i put up the tree in my bathroom, but it needs a few more ornaments, so tomorrow i'm going to the mall across the street to pick up a set i saw the other day, and then it'll be done.

i got the tree in my bedroom up, which is really the easiest one, since i use the same ornaments on it every year! i did use a different topper this year, and i love it - i don't know why it never occurred to me before! that tiara's been sitting on my shelf for years.

black tree

black tree topper

the tree itself is one i spraypainted years ago, looking at it today, it could use some touch ups! the garlands are black and silver scarves that i found at a dollar store, and the ornaments are mostly all from micheals, oddly enough. the purple and red balls are from micheals, and so are the glittery purple sprays of fake foliage or whatever they're called (is there a word for them?). the lights are purple, though they look sort of blue in the picture. i picked them up at halloween one year, so they have a black cord, not the usual green one available at christmas.

i'm super excited to put up my big tree this year, because i haven't had space for 4 years now. i have a large collection of vintage ornaments (and i've pared it down considerably too!), and they'll all go on it. there's a bit of a problem because no one can FIND my big tree though! my dad borrowed it to decorate at work one year, and since i haven't needed it, we're not sure where it went after that. i went out and bought a pre-lit tree that goes together in just 3 pieces, and now i'm not so sure i even WANT him to find my old tree, with it's millions of branches to assemble!

i have so many crafty things i want to do right now, i've obsessed with wreaths, and have so many ideas - more ideas than i have doors to hang wreaths on! i bleached a bunch of bottle brush trees and wreaths the other day, and now i'm dying them. one colour in particular is coming out SO vibrant, i just love it.
bleaching trees
i bought my trees at dollar stores this year. it was marginally cheaper to buy them at micheals using a 40% off coupon for the big bag (and frankly, JUST marginally. micheals is so expensive), but the ones from micheals rusted much easier, and have plastic bases, which don't paint as well.


i'm trying to do some machine embroidery, though it's slow going - for some reason my machine is only stitching at half the speed it used to stitch at. weird, i know! no one can figure out why - the dealer that serviced it, or the brother technical support. and even though i'm using the same designs i used last year, i'm having difficulty with some of the stitching. words look wonky.

i don't know. i might just be imagining the wonky thing. maybe they were wonky last year, and i just didn't notice!

i did stitch up a shirt for my dad the other day - he called me up out of the blue and needed me to do it super quick for him. they'd had a co op student working with them for the last few months, and yesterday was his last day, so they wanted a t-shirt for him. it was originally going to say "#1 examiner" or something, until he got the idea to write "cougar bait" on it, at which point he phoned me again, all excited! apparently all the middle aged women that he works with just loved the co op student, and they teased him about older women all the time. dad found this image online, i have no idea where, and sent it to me. i digitized it with PE Design Lite, and stitched it on the upper left side, and then stitched the workplace and the year on the sleeve. for such a rush job, it turned out pretty well!

cougar bait - request from my dad
this is a screen print from the digitization, i didn't have time to take a picture of the actual shirt.

and that's about all i've been up to. a few little xmas presents that i'm trying to get done in time to send out, and i need to get my cards out soon too! i'm super duper close to being finished an embroidery project, but i set it down for a bit while i worked on a project that turned out awful - it's so frustrating! i haven't done much cross stitch, but that's okay, because i still haven't posted the last pieces i did!
Related Posts with Thumbnails